Showing posts with label Vegetable Garden. Show all posts

Monday, April 19, 2010

Fast and Furious!

As you may have notice I've been taking a bit of break from blogging.... life just gets too busy sometimes. I won't even try to catch up since I'm so far behind but I hope to begin blogging more again more regularly.  While I was gone I have been lurking on your blogs and have been so impressed with everyone's garden! I just love this time of year!

About 2 weeks ago we had a wonderful burst of unseasonable warm hot weather.  It felt fantastic but was a bit of tease for all of us humans as well as the plant world!  Most of our spring blooms and shoots started coming up earlier than usual.  It was quite a sight to see azaleas blooming the first week of April and for peony shoots to be standing so tall. 


But now the seasonable weather has been back for the past week and a half, and it's been back down the 50s regularly and the plants are responding by slowing back down.  Thank goodness I say since although I do love the warm weather I hate to rush spring.

So here's a tour of what's been going around our place.


The daffodil below popped up unexpectedly. I love when plants naturalize (as long as they aren't weeds of course!).  I'm not sure what the species is.  Does anyone know?


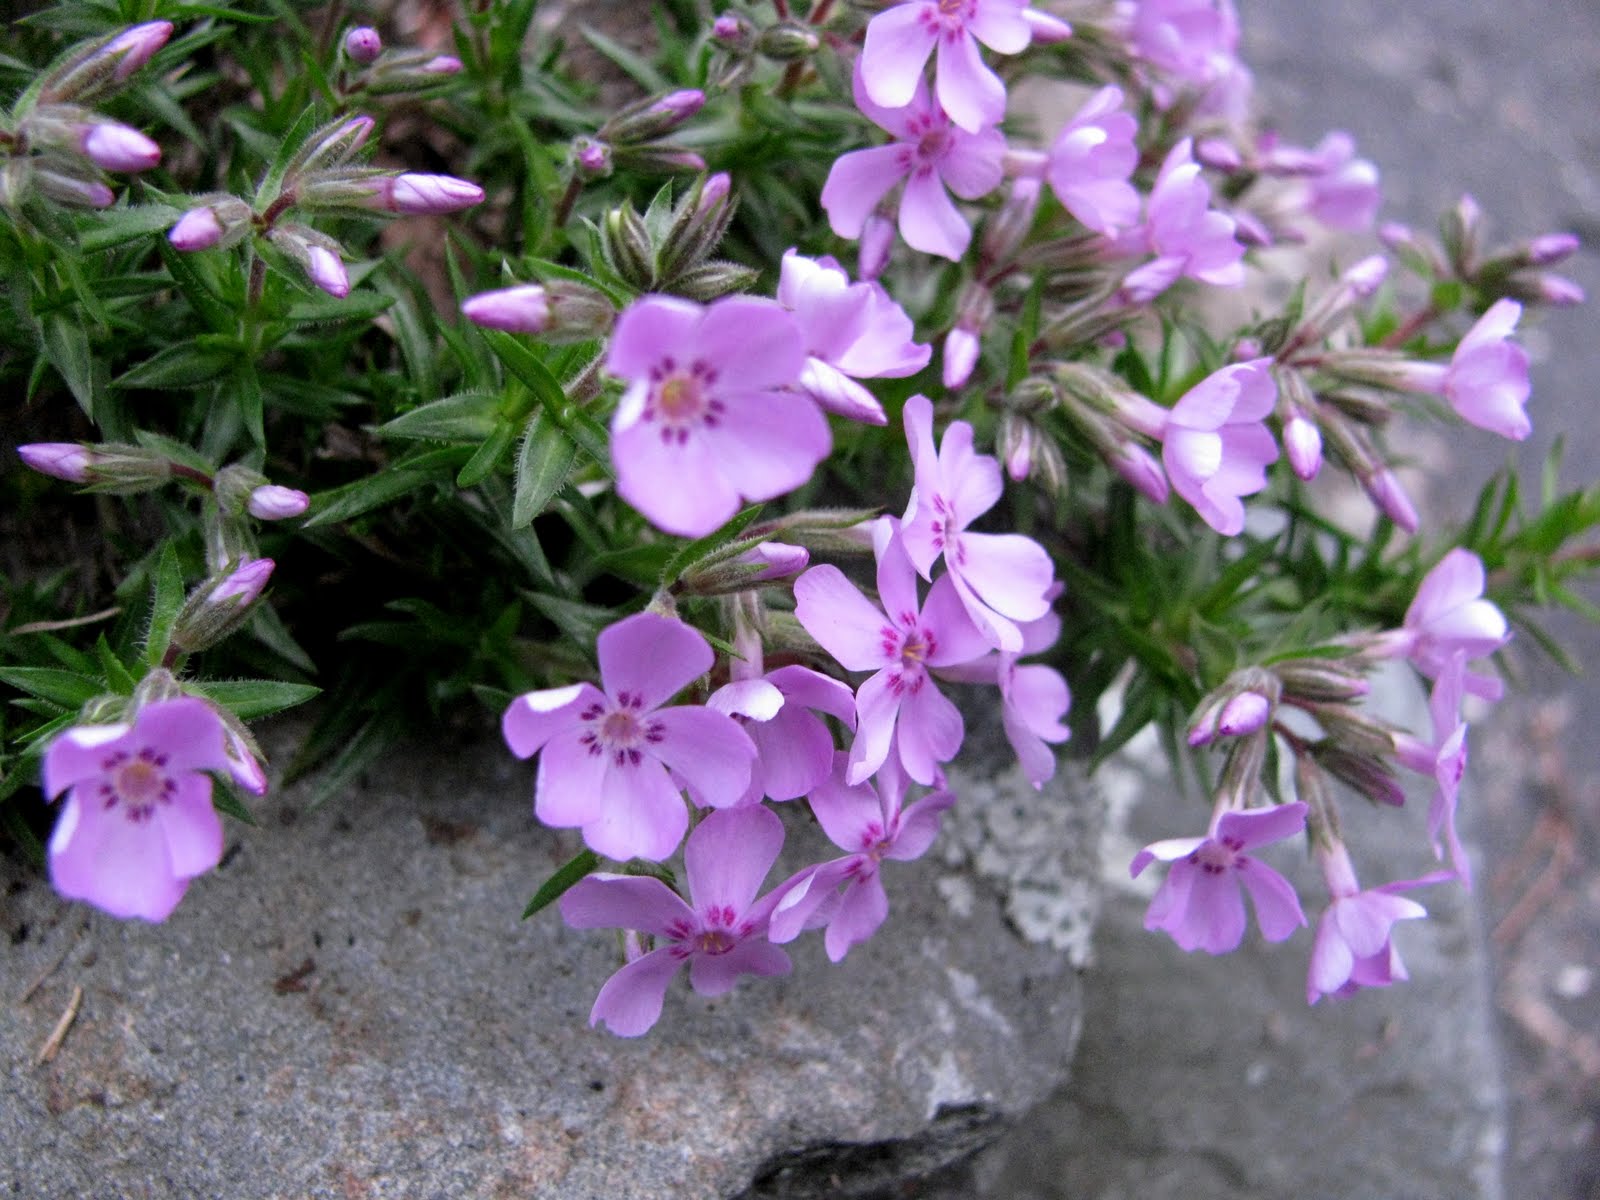
The spring phlox has been blooming very early.  As you can see I haven't even had a chance to clean up this area yet.


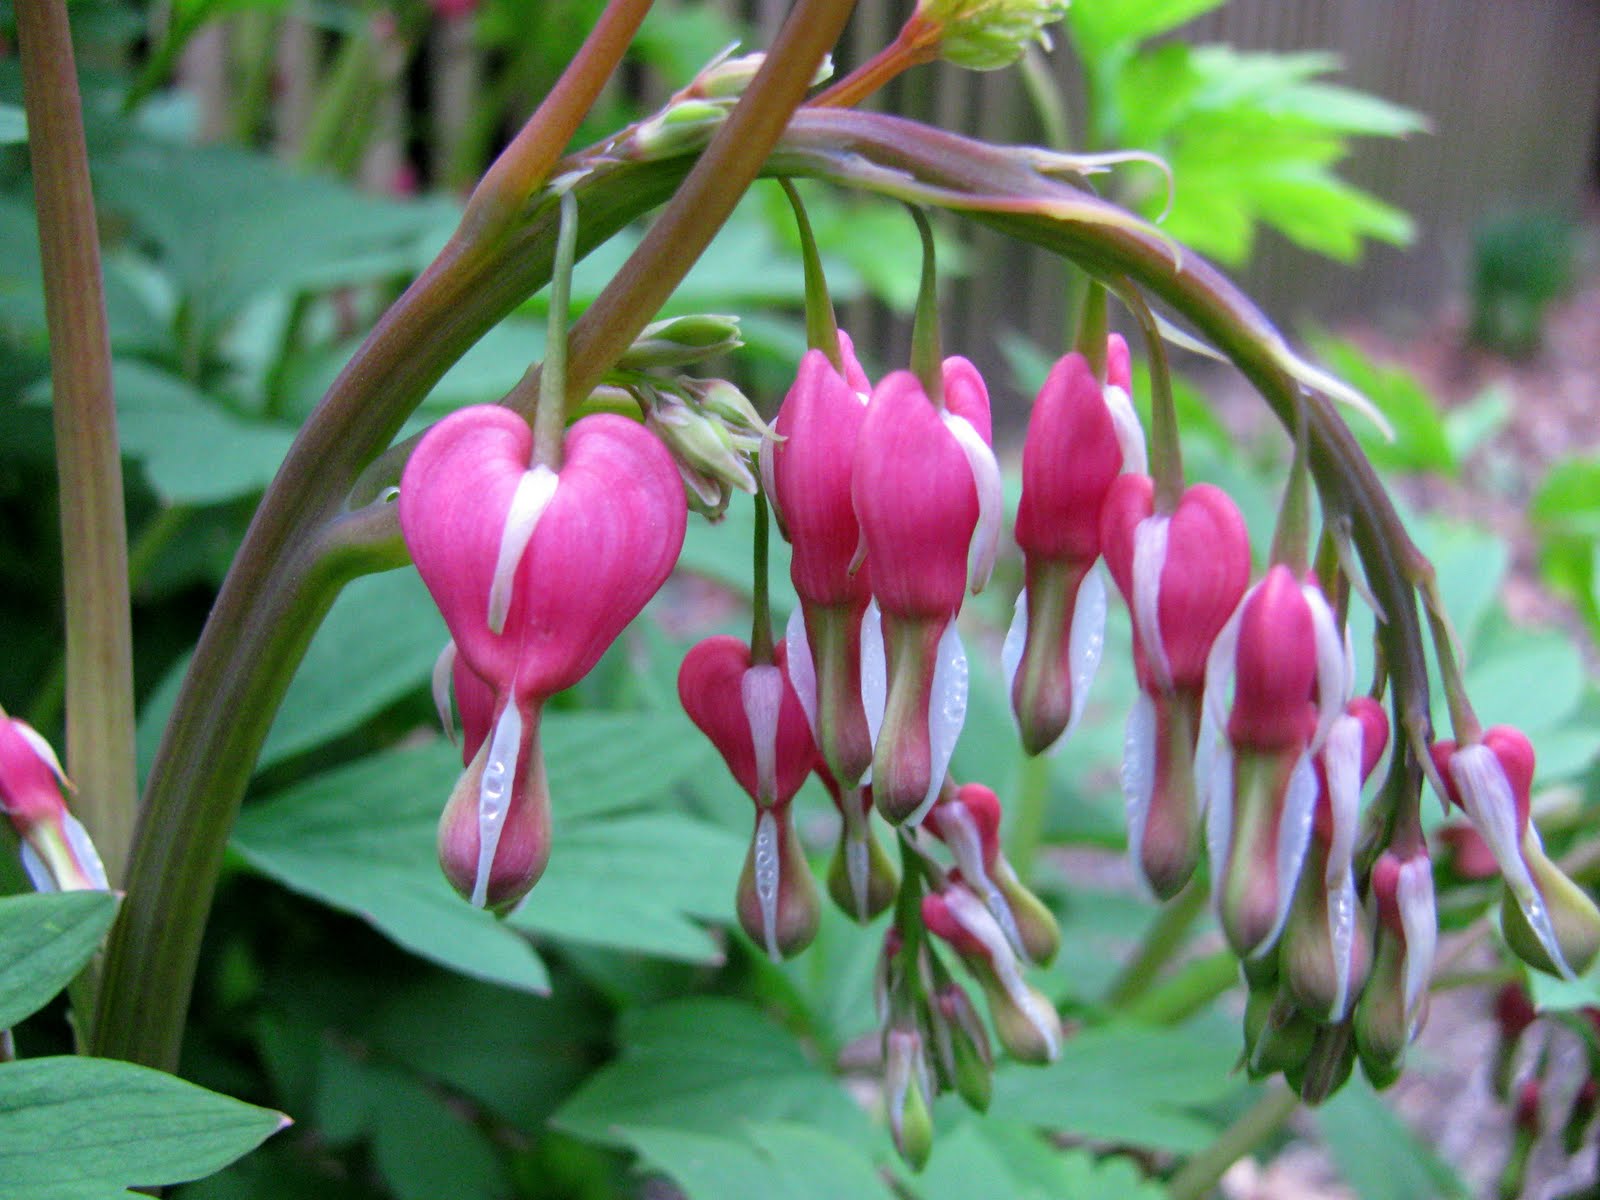
One bleeding heart in red...

Another bleeding heart in white...


Amazingly to me the tulip bulbs I planted last December are getting ready to bloom!  This pic was taken a week ago and they are much taller now and ready to burst.


We've also been working hard on getting the veggie garden ready.  Here is our huge compost pile.  It's almost gone now because we've been spreading it around the gardens.


Andy also built me a large pea bed.  I hope to sow the seeds this week.


Andy is tilling the compost bed in the pic below.  I get a bit concerned with powerful, mechanical tillers because of what they do to the worms, but we didn't have the strength or the patience to do this by hand.


More tilling....   Ellie was trying to attack the tiller!  We kept her at a safe distance, but she was barking and growling like crazy.  She does the same thing with the vacuum cleaner.... true vicious terrier! Ha!


Of course ya have to have some nice manure to add...


The cold weather veggies all planted (except for the peas).  I've got broccoli, purple cabbage, spinach, and collard greens in this bed.


In this bed there are more collard greens, swiss chard, and several varieties of red and green lettuce.


These beds are reserved for summer veggies so I won't be planting here until after the last frost - except for the carrots - I'll be sowing them in the ground fairly soon.  Usually around Memorial Day in our area I'll plant the warm-weather loving veggies, but I'll start sowing some squash and cucumber seeds indoors within the next week. 

Tuesday, July 28, 2009

Spinosad Strength

I'm squash giddy!


I just can't get enough of them this year. (I know some of you must think I'm nuts as you probably can't give the stuff away.) But I have a reason to be happy. You see last year we had a bad case of vine borers. So bad in fact that I lost all of my squash, pumpkins, and melon plants to it. Those evil borers killed every single last one.


So in effort to find a solution for the following year I did tons of research on the best organic pesticides to control these little devils. BT (Bacillus thuringiensis) I knew was an option, but it had a few drawbacks - one being that it didn't last very long and had to be applied often. Then I found spinosad and it was like a beam of golden light started shining on my garden (Ok... that's hokey and I'm exaggerating but you get my drift).


Perhaps the best thing about products containing spinosad is the safety factor for use around people, animals, and beneficial insects. Spinosad is safe even to use around adult butterflies and many insect predators and parasites. Spinosad keeps killing for up to 4 weeks instead of the one or two days residual you get with BT. In addition, spinosad kills thrips, which Bt doesn't faze.

I buy the Monterey Garden brand, which I order from Planet Natural.

Here's the product description:

Spinosad is a relatively new insect killer that was discovered from soil in an abandoned rum distillery in 1982. Produced by fermentation, Spinosad can be used on outdoor ornamentals, lawns, vegetables and fruit trees, to control caterpillars, thrips, leafminers, borers, fruit flies, and more. Spinosad must be ingested by the insect, therefore it has little effect on sucking insects and non-target predatory insects. Spinosad is relatively fast acting. The pest insect dies within 1 to 2 days after ingesting the active ingredient. Will not persist in the environment. Sunlight and soil microbes break it down into carbon, hydrogen, oxygen and nitrogen. Classified as an organic substance by the USDA National Organic Standards Board. Organic active ingredient produced by fermentation. B.T. replacement, more effective pest control. Can be used on vegetable & fruit crops, ornamentals, and turf. Controls caterpillars as well as beetles, leafminers, thrips and more!

Early in the growing season I applied spinosad on all my veggies in the raised beds. It prevented the usual onslaught I get with leaf loopers on my broccoli and cabbage. It also prevented the tomato worm. While my neighbors broccoli was filled with leaf looper holes I had none - well I did have holes but those were from the slugs - which is another story.... *sigh*

With all the rain we got I missed a spraying I would normally do a few weeks later. Then on one sunny day I came out to see this...


What you see here is evidence of a vine borer. You can't see it in the picture but in person you could see what looked like saw dust around the stem, which was also cracked and soft - this wasn't a case of normal stem splitting. I knew spinosad works and that the only reason I had this problem was because I missed a spraying. The good news - there was a solution.

Usually once the borer is inside vine itself there isn't much you can do except try to slit the stem, cut out the borer, and bury the stem in the dirt in hopes that it will take root and survive. But, with spinosad there is another option that works much better and that is to inject the pesticide directly into the stem.

I did this by mixing up the spinosad concentrate with water according to the package directions and then pouring a small amount into a plastic cup so I could draw it up easily into a syringe. (The product directions are for mixing up an entire gallon so be prepared to use the rest to spray your garden with because the mixture can not be stored). You can use any type of needle or garden syringe to do this job. I used an insulin syringe that I had when we cared for our diabetic cat a few years back but if you don't have a medical syringe you can order a garden syringe online - it doesn't have a fine needle point but works just a well. After filling up the syringe I injected the pesticide into the affected stem (I even injected into the stems of plants that weren't obviously infected just for good measure). The result - 3 weeks later my squash plants are still thriving and there is no sign of active vine borers. Each and every stem is sturdy and hard, and even the one that had the borer in it has has recovered - amazing!

If you haven't tried this product you may want to give it shot. I really does work.

Tuesday, July 21, 2009

There's potatoes In Those Hills!

I planted potatoes in mid-June for a late summer/early fall crop. You can see how I planted them by going here.

The plants are now about 12 inches high and I knew it was time to hill them up. I would recommend hilling sooner than I did but since I planted the potatoes so deeply there was nothing poking through yet.


Potatoes form between the seed piece and the stem of the plant. The deeper you plant the seed potato the more room there will be for your tubers to grow. Hilling potatoes is necessary because as the tubers grow they begin to pop through the surface of the soil which causes the developing tuber to turn green. Green tubers can be toxic when eaten and cause a nasty upset stomach.

I read up on hilling potatoes and found there to be just as many methods for hilling as there are for planting the seeds. Good hilling materials include compost, soil, dry shreded leaves, hay, and straw. Each seems to have it's pros and cons. I did find that most gardeners recommend not using manure to hill since it often causes root rot.

I decided that the easiest way to hill my potatoes would be to use straw. Since I didn't want weeds in the bed I made sure to get a straw product that had been sterilized such as Mainly Mulch.


To keep the straw in the bed Andy screwed some stakes into each corner of the bed and then wrapped the entire bed in plastic garden fencing.


You can use any material to fence the bed in - chicken wire works great too. It doesn't need to be as high as we made our fence (we just used what we had laying around) but it needs to be high enough to contain the hilling material.

Here you can see the plastic fencing we used. It comes in a roll and is easy to work with. It's very inexpensive - we bought it last year at Lowes and had some left over to use here.


Once the fence was up we added the straw and made it sure it was fluffy. One of the problems of using straw is that it can attract pests as well as fungus as it decomposes so it's important to make sure you keep it fluffed up so the air lets it breathe. Packing it down would cause many problems and could reduce yield.


For this first hilling we made sure that we went about 6 inches up the stem. In another few weeks we'll add another 6 inches of straw. I'll keep a careful eye out for signs of disease and pests. Before we added the straw I sprayed the plants with copper fungicide to prevent blight. I also sprayed with Spinosa to ward off any pests. I'll spray both again in about 2 weeks.

Sunday, July 19, 2009

Relax and Watch the Veggies Grow

Ahhhh... doesn't this look comfy? I love lazy mid-summer days.


The weather in New England is beautiful. We don't get sizzling heat (at least for the most part unless we get a heat wave) and it's the perfect time to enjoy all the hard work I put into the garden during the spring planting season.

Let's take a little break and see how the veggie garden is doing.

Bed #1 looks great! I've got tomatoes (12 plants - all different varieties), 6 sweet pepper plants, and 6 eggplants. So far this year my tomatoes look better than any other previous year. I think the raised bed made a huge difference. The soil is much richer and I don't have to water as often. Today I sprayed the tomatoes with copper fungicide since late blight is prevalent in our area. Thankfully I have no signs of it so I'd like to keep it that way.


No red tomatoes yet, but tons of green ones of all sizes. Here's a small one, but I've got many large tomatoes that I'm just drooling over waiting for them to get red. A few are pink so they are getting there.


The eggplants are small but healthy with many flowers and a few tiny fruit.


This pepper is almost ready to pick.


Bed #2 has carrots on the far left, parsley, bush green beans, and cucumbers. I'll start harvesting the beans this week.


The cucumbers are doing well. Here's a close look at a baby cuke.


Bed #3 has broccoli, several herbs, beets, cabbage, and cauliflower. I had difficulty early on with leaf loopers but stomped them out with Spinosa. The biggest challenge with maintaining this bed is keeping the slugs away. They've done more damage than anything else.


A floret growing nicely.


The cabbage is starting to form.


Bed #4 has onions, lettuce, basil, swiss chard, and butternut squash over on the far right. I didn't think the squash would grow so I just stuck it in this bed, now it's taking over as winter squash always do. I've asked Andy to build me tepees for them to vine up.


Bed #5 is the squash bed. I have zucchini and yellow squash here. They've almost doubled their size in the short few days since I took this picture - how fast they grow always amazes me.


You'll notice in the back of the squash bed are some container plants of tomatoes. These are the ones that I grew from seed and started very late. I didn't think they'd make it but they did and by the time they turned around I had already bought plants and put them in the ground so I had to get some containers for these.

The zucchini I grew from seed. The variety is Cashflow from Johnny Seeds. I picked these 2 today - my first ones of the season!


The yellow squash is Zephyr from Johnny Seeds. I love the 2 tone color. I can't wait to taste one.

Here a flower is starting to form on the winter squash. This is butternut squash - Waltham by Johnny Seeds.


I had some left over pepper plants so I stuck them in some bright pink buckets. I love the color they add to the garden. These are small plants for this late in the season but they are doing well and have tiny peppers on them.


Finally, here's the potato bed. I sprayed them with copper fungicide as a preventative measure against late blight. Today Andy and I hilled them with Mainly Mulch straw mix. I'll show you in another post later this week how we did it.


The last bed I don't have a picture of since there is nothing to show. It had the snap peas in it and I pulled the plants out last week since they were done for the season. We got nice harvests from them but not as much as I had hoped. Next year I'm going to put in a few more plants to get a higher yield. The peas were the sweetest ever and we enjoyed them for many meals. In a few weeks I'll be sowing in this empty bed for some fall crops of kale, collard greens, and lettuce.